In the unpredictable world of automotive emergencies, encountering a dead car battery is an inconvenience many of us have faced. Thankfully, the evolution of technology has given us the gift of portable jump starters, empowering car owners to take control of their destinies when the engine refuses to roar to life. This comprehensive guide aims not only to unravel the intricacies of how to use a portable jump starter but also to explore the nuances of employing a jumper box, utilizing a jump box, jumping a car with a battery charger, and understanding the process of charging a portable jump starter.
Understanding How to Use a Portable Jump Starter
Before diving into the step-by-step process of jump-starting a vehicle, it’s essential to acquaint yourself with the various components of your portable jump starter. Typically, these devices comprise a compact yet powerful battery, jumper cables with clamps, and various ports for charging and other functionalities.
How to Use a Portable Jump Starter
Here are the important steps for using a jumper box:
a. Connecting the Jumper Cables
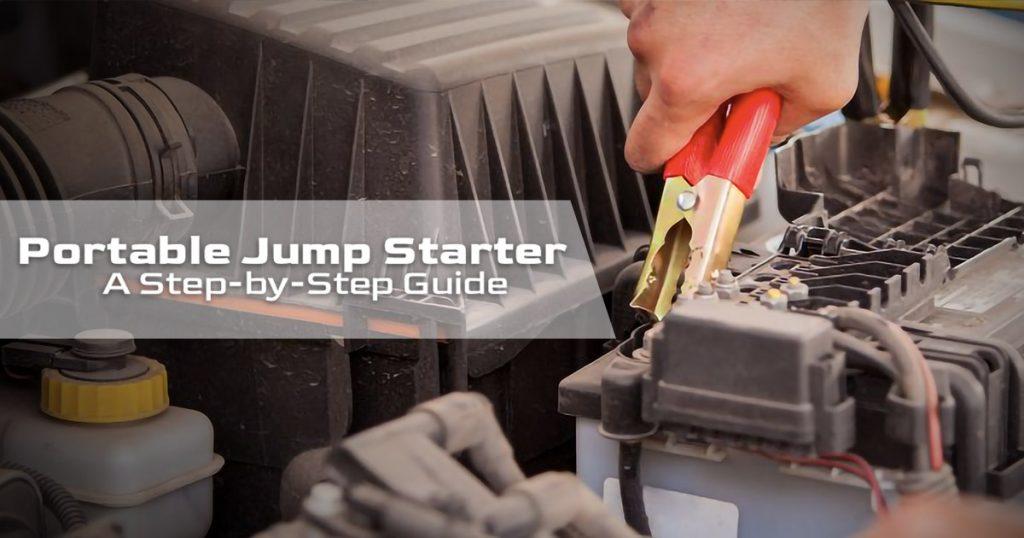
When it comes to how to use a portable jump starter, the initial and crucial step involves properly connecting the jumper cables. Begin by taking the red (positive) clamp and securely attaching it to the dead battery’s positive terminal. This positive connection facilitates power flow from the jump starter to the vehicle’s battery, kickstarting the revival process.
The black (negative) clamp should be joined to a metal surface on the car that has a dead battery at the same time. This metal surface should be strategically chosen to protect it from the battery and any moving parts. The objective is to establish a secure ground connection, prevent potential electrical mishaps, and ensure a safe jump-starting procedure.
This careful and precise placement of the jumper cables lays the foundation for a successful jump-start, emphasizing the significance of the positive and negative connections in revitalizing a dormant vehicle.
b. Powering On the Jump Starter
With the jumper cables securely in place, the next step involves powering on the portable jump starter. This phase is where the technological prowess of these devices shines. Many modern models have user-friendly features such as built-in indicators or screens that offer real-time information.
These indicators come to life as you activate the jump starter, providing valuable insights into the battery level and charging status. This visual feedback reassures you that the jump starter is functioning and allows you to monitor the charging process. The transparency these indicators offer is a testament to contemporary portable jump starters’ convenience and user-centric design.
So, power on your jump starter confidently, keeping an eye on the informative displays that guide you through the charging journey.
c. Starting the Dead Vehicle
Having successfully connected the jumper cables and powered on the jump starter, the next moment of truth arrives as you attempt to start the vehicle with the dead battery. Engage the ignition and listen for the familiar purr of the engine. However, exercise patience if the engine hesitates or refuses to start.
Waiting a few minutes before making another attempt serves a crucial purpose. This waiting period allows the portable jump starter to work magic, transferring a sufficient charge to the dead battery. It’s akin to giving your vehicle a moment to catch its breath and absorb the revitalizing energy the jump starter provides.
This deliberate and measured approach to starting the dead vehicle not only enhances the effectiveness of the jump-starting process but also contributes to the overall health of the vehicle’s battery and the portable jump starter itself. Remember, patience can make all the difference in transforming a silent engine into a roaring powerhouse.
How to Use a Jumper Box
Commonly referred to as jumper boxes due to their compact and box-like design, portable jump starters function similarly to conventional jump starters. Here are the steps on how to use a jump box:
a. Connecting the Jumper Cables
The connection process mirrors that of using a traditional jump starter. Connect the black clamp to a hard surface on the car with a dead battery and the red clamp to the dead battery’s positive terminal.
b. Activating the Jumper Box
Turn on the jumper box and confirm that it’s supplying power. Some jumper boxes have extra features, like air fans or USB ports for charging electronics.
c. Starting the Vehicle
After activating the jumper box, attempt to start the vehicle. If it works, let the engine run for a few minutes so the alternator has time to charge the battery.
How to Jump a Car with a Battery Charger
A battery charger can be a reliable alternative when a portable jump starter is unavailable. Here are the steps you can use to jump a car with a battery charger:
a. Connecting the Battery Charger
Connect the battery charger’s positive (red) clamp to the dead battery’s positive connection. Connect the negative (black) clamp to a metal part of the car’s frame simultaneously.
b. Setting the Charger
Make sure the battery charger is set to the right voltage and power. Some chargers come equipped with a “jump-start” mode, specifically designed for jump-starting vehicles.
c. Charging and Starting
Before you start the car, ensure the battery has enough time to charge, usually between 10 and 15 minutes. Once charged, attempt to start the vehicle, and if successful, let it run for a few minutes to ensure the alternator replenishes the battery.
How to Charge a Portable Jump Starter
Ensuring the readiness of your portable jump starter is paramount for tackling unforeseen dead battery scenarios:
a. Using the Provided Charger
Most portable jump starters are accompanied by their charging cables. Plug the charger into a wall source and plug the jump starter’s port into the charger.
b. Monitoring the Charging Process
Pay close attention to the payment process. When the jump starter is fully charged, disconnect the charger so the device doesn’t get overcharged, which can shorten its life.
c. Regular Maintenance
Establish a routine for maintaining your portable jump starter. Check the battery level occasionally and charge it if it needs it. This practice ensures that your jump starter is always prepared for action when needed.
Effectively Understand How to Use a Jump Starter
In automotive self-sufficiency, mastering the art of using a portable jump starter is a skill every car owner should possess. Following the comprehensive guidelines outlined in this article on how to use a portable jump starter, jumper box, jump box, jump a car with a battery charger, and charge a portable jump starter, you’ll be well-prepared to navigate the challenges posed by a dead car battery. Remember, preparation is the key to turning a potential roadblock into a mere bump in the journey, and a well-maintained portable jump starter can be your trusty companion in such situations.